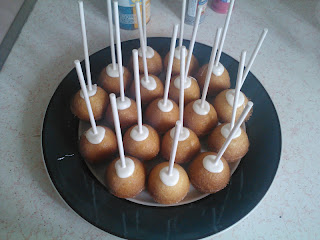
First step is to bake the cake pops and then set them out to cool.
Once they are cooled and baked, the next step is to insert and secure the sucker sticks. To do this, melt a small amount of melting chocolate (I found mine at Michael's). Dip the sucker stick into the chocolate and insert into the cake ball. Place in fridge or freezer for 10-20 minutes allowing the chocolate to cool completely and stay secure in the cake while dipping in the next step.
While the cake pops set in the fridge/freezer I melted a small amount of green chocolate. I then drizzled the chocolate into small (pig nose size) dots onto wax paper. Be sure to make enough dots for the amount of pigs you wish to make. Place those in the fridge to set as well.
(I did not take a picture of this step, I apologize.)
Once the cake pops are set and the sticks are secure you will melt the remainder of your green chocolate. Begin carefully dipping your cake into the green chocolate spinning slowly to coat the entire ball of cake. Slowly remove from chocolate and continue to spin slowly over the bowl helping the excess chocolate drip off.
For the pigs helmets I just used chocolate sprinkles. Once the excess chocolate is off, dip the ball a little less than half way into the chocolate sprinkles. At this point you will need to place the eyes and noses of the pigs as well. For the noses I removed from the wax paper and placed the flat side out making for a good finish for the pig nose. The eyes I used white chocolate chips, but pre-cut the tips off of them. Set pops on wax paper to allow chocolate to begin to harden.
 |
| This is what your pig will look like while the chocolate sets and hardens. |
 |
| I had a little helper |
Once the chocolate is completely hardened I did the finishing touches to the pig. I just used black icing and dotted the eyes, the nose, and made a little mouth.
 |
| And here is the final thieving pig! |
For the Birds I used much of the same technique, but obviously skipped the dipping in the sprinkles step and there was no need to place a nose before the chocolate is dry. And I obviously used red melting chocolate.
I used the same white chocolate for the eyes, placed right after dipping then set on wax paper to dry. I used the same black icing after the chocolate had hardened for the eyes and brows. I also placed some small tail feathers on the back in black also.
For the beak I just used orange icing.
 |
| The finished Angry Red Bird |
The cake pops should be stored in the fridge until ready to serve.
And here are the finished pops!
Useful Tips:
The amount of cake balls made with one cake mix can be coated with one bag of chocolate that I purchased from Michael's so long as you allow the excess chocolate to drip off as needed.
As you can see from my red pops, the tops ended up flat because of how I placed them on the wax paper to cool. The ones dipped in sprinkles did not have this issue, so if you want to make a clean, smooth overall cake pop, consider using foam purchased at any craft store to insert sticks while the chocolate sets.
I hope this helps others while attempting to make your own Angry Birds cake pops. I know I would have found something like this useful when I started, but I am happy with how they turned out. I would like to attempt to make the other colored birds at some point... Maybe when my son turns 6?
Gives me a year to recoup from this year!


No comments:
Post a Comment